Fuzed
Well-Known Member
- Joined
- May 19, 2012
- Messages
- 1,452
- Reaction score
- 2
Rapid Fire Tutorial for xbox 360
Works for Halo 3 , MW2, COD5, More...
Rapidfire With "12f683"
Stage 1: Building the Programmer
ok first we will get warmed you by building the programmer...
Equipment required....
(May or may not need some stuff depends on install and controller)
-Soldering iron 15-30W
-Solder
-30AWG wire (Thin Wire)
-Pic12f683
-N-channel MOSfet (Bs170 or IRF 510)
-Momentary Switch
-1N4148 Diode
-Resistor 330 Ohm
-Resistor 470 Ohm
-Resistor 10K
-Resistor 1K
-Resistor 22K
-Resistor 2.2k
-Leds 3-5MM (Optional)
-Socket 8 pin for the chip (recommended but optional)
-RS232 (serial) female socket.
-USB Cable For Power(Any 5V Source)
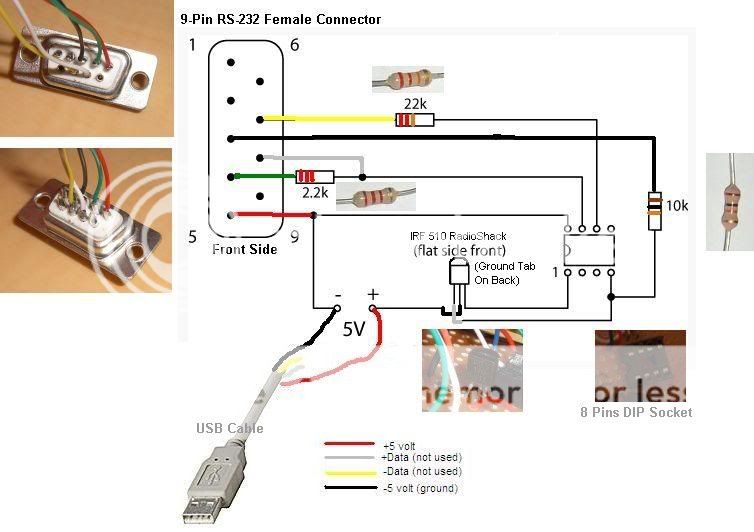
OK that said here is the schematic for the programmer pretty straight Forward...Depending if you are going to use leds, I did...it tells you power and read/write...
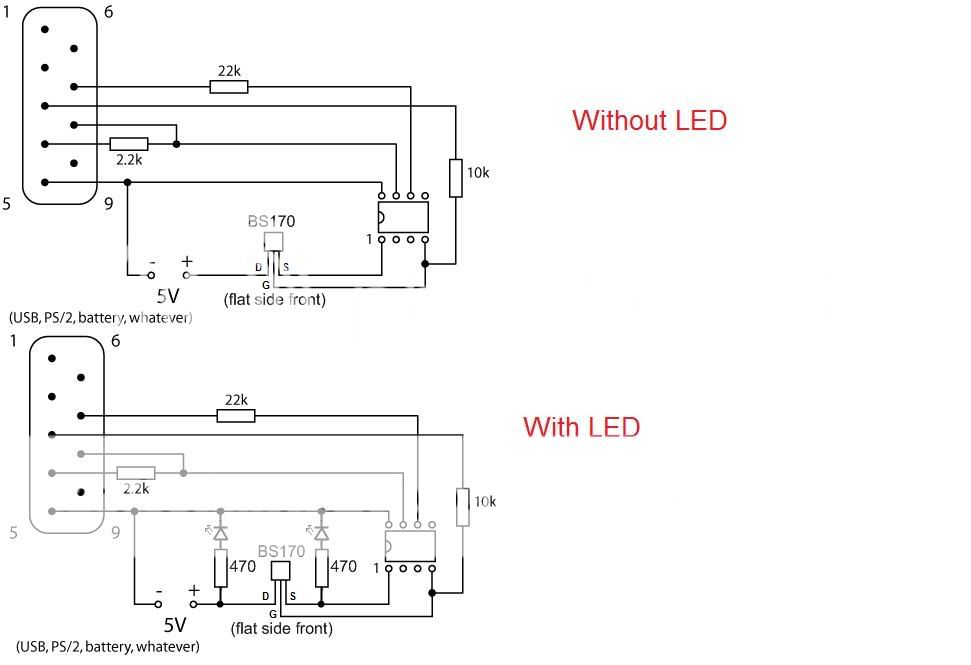
Top uses Bs170 & Bottom IRF 510 both will work just different wiring
Step 2: Programming
Decide on the style of Rapid fire you want either
Sleeper:
No cutting or drilling required the controller looks totally stock has 3 mode..
Mode1= Halo 3 Dual Trigger
Mode2= Cod 5 WAW
Mode3= MW2
Rapidfire RF:
You have to install 2 buttons one for each trigger (only to change mode you will not actually use it to fire) .This one has the ability to enable/disable Rapidfire on each trigger independently...you can also have different mode in both triggers at once, e.g.
Left Trigger Halo3 speed, Right trigger Cod4 speed,
Left trigger Cod5 speed right trigger halo3 Speed, so on and so on...
Mode1= Halo 3 Dual Trigger
Mode2= Cod 5 WAW
Mode3= MW2
Mode4= Cod 4 Ultrafast
Once you have chosen:
1.Install WinPic800.exe
2.Open Win PIC make sure your programmer in connected...
you might have to choose English from the second last menu item at the top...
go to
Settings>Hardware>Choose JDM Programmer and Select your com port and select APPLY...Test hardware by pressing (Ctrl+T)
Now You are ready for programming...Make sure you have Pic12F683 selected at the top right hand corner.
Open the Hex File (File>Open), (either GameplayRF.hex or Sleeper.hex) depending on the style you are going to be modding it...
Then simply got to
Device>Program All (Ctrl+P)
DONE now you are ready to put it in your Controller
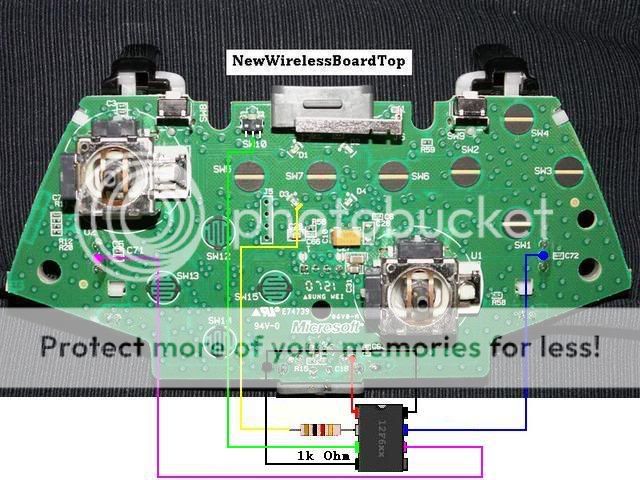
Step 3: Installation
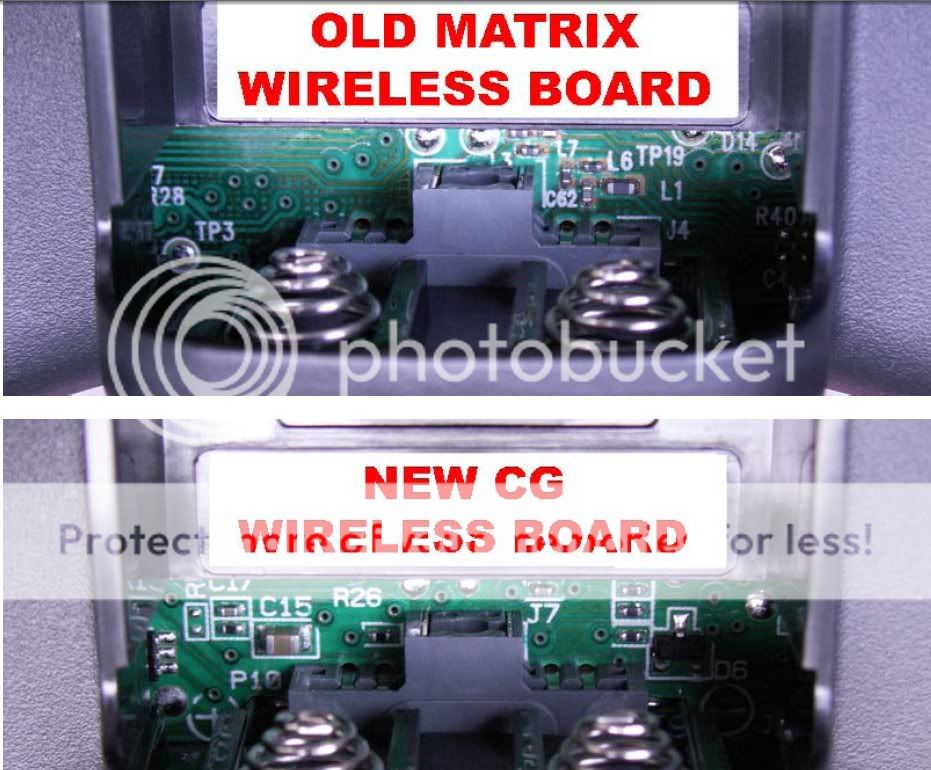
1. Decide which controller you have & wire according to how you programmed your chip!!!
Use Resistor Colours.exe to know what each resistor looks like for the install!!!
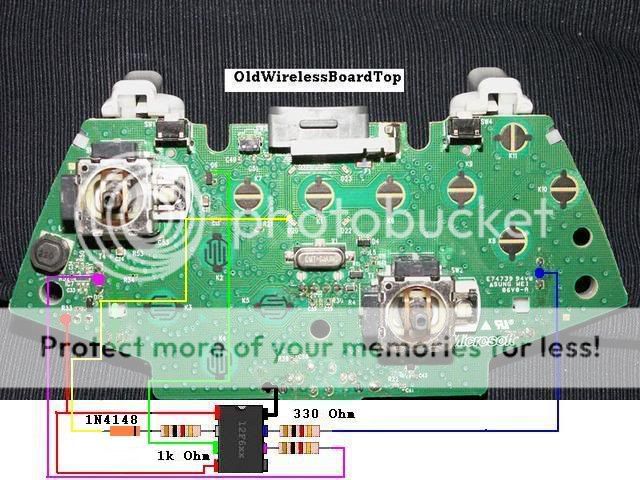
Sleeper Install
OK if you have decided to do the Sleeper install here is how you wire the Controller.
CG Sleeper
Matrix Sleeper
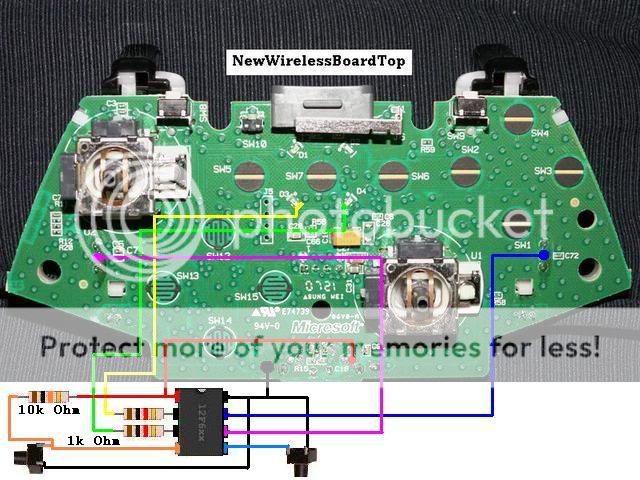
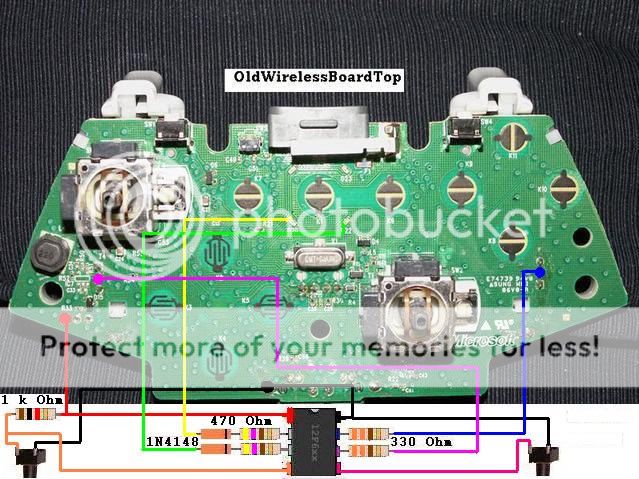
Rapidfire RF install
OK if you have decided to do the Rapidfire RF install here is how you wire the Controller.
CG Rapidfire RF
Matrix Rapidfire RF
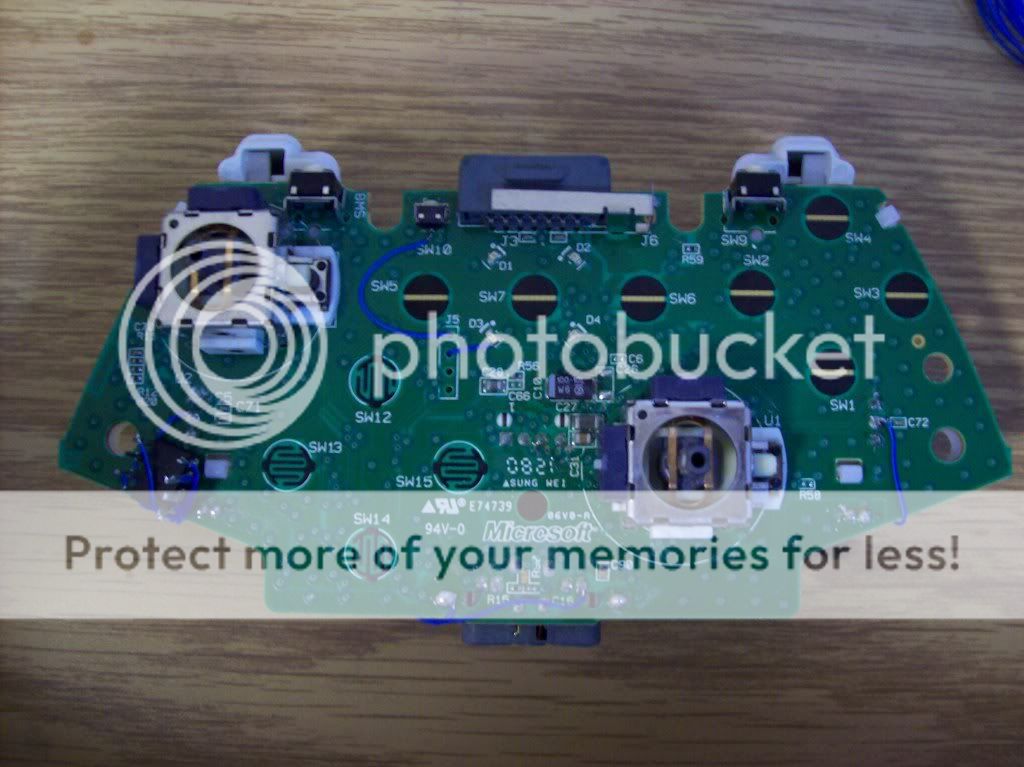
Installed Pictures
Works for Halo 3 , MW2, COD5, More...
Rapidfire With "12f683"
Stage 1: Building the Programmer
ok first we will get warmed you by building the programmer...
Equipment required....
(May or may not need some stuff depends on install and controller)
-Soldering iron 15-30W
-Solder
-30AWG wire (Thin Wire)
-Pic12f683
-N-channel MOSfet (Bs170 or IRF 510)
-Momentary Switch
-1N4148 Diode
-Resistor 330 Ohm
-Resistor 470 Ohm
-Resistor 10K
-Resistor 1K
-Resistor 22K
-Resistor 2.2k
-Leds 3-5MM (Optional)
-Socket 8 pin for the chip (recommended but optional)
-RS232 (serial) female socket.
-USB Cable For Power(Any 5V Source)
OK that said here is the schematic for the programmer pretty straight Forward...Depending if you are going to use leds, I did...it tells you power and read/write...
Top uses Bs170 & Bottom IRF 510 both will work just different wiring
Step 2: Programming
Decide on the style of Rapid fire you want either
Sleeper:
No cutting or drilling required the controller looks totally stock has 3 mode..
Mode1= Halo 3 Dual Trigger
Mode2= Cod 5 WAW
Mode3= MW2
Rapidfire RF:
You have to install 2 buttons one for each trigger (only to change mode you will not actually use it to fire) .This one has the ability to enable/disable Rapidfire on each trigger independently...you can also have different mode in both triggers at once, e.g.
Left Trigger Halo3 speed, Right trigger Cod4 speed,
Left trigger Cod5 speed right trigger halo3 Speed, so on and so on...
Mode1= Halo 3 Dual Trigger
Mode2= Cod 5 WAW
Mode3= MW2
Mode4= Cod 4 Ultrafast
Once you have chosen:
1.Install WinPic800.exe
2.Open Win PIC make sure your programmer in connected...
you might have to choose English from the second last menu item at the top...
go to
Settings>Hardware>Choose JDM Programmer and Select your com port and select APPLY...Test hardware by pressing (Ctrl+T)
Now You are ready for programming...Make sure you have Pic12F683 selected at the top right hand corner.
Open the Hex File (File>Open), (either GameplayRF.hex or Sleeper.hex) depending on the style you are going to be modding it...
Then simply got to
Device>Program All (Ctrl+P)
DONE now you are ready to put it in your Controller
Step 3: Installation
1. Decide which controller you have & wire according to how you programmed your chip!!!
Use Resistor Colours.exe to know what each resistor looks like for the install!!!
Sleeper Install
OK if you have decided to do the Sleeper install here is how you wire the Controller.
CG Sleeper
Matrix Sleeper
Rapidfire RF install
OK if you have decided to do the Rapidfire RF install here is how you wire the Controller.
CG Rapidfire RF
Matrix Rapidfire RF
Installed Pictures