Fuzed
Well-Known Member
- Joined
- May 19, 2012
- Messages
- 1,452
- Reaction score
- 2
*Photoshop Guide
*This might be a little complicated and a little hard to understand, so read carefully
lets say your signature is gonna be 350 x 200. But with the pop up it makes the hight higher.
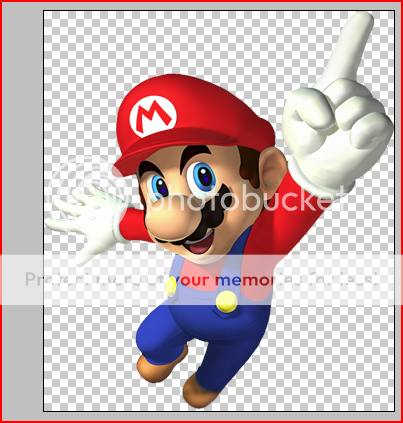
* Example: My sig. , the hight is around 200 pxl. but with the fat head popping out it adds hight to the sig. that cant really be seen.
Make sure you estimate around how tall the part of your signature that is gonna pop out is. Because that is gonna be actual high of your Sig.
So now make a new project with the width and corresponding hight.
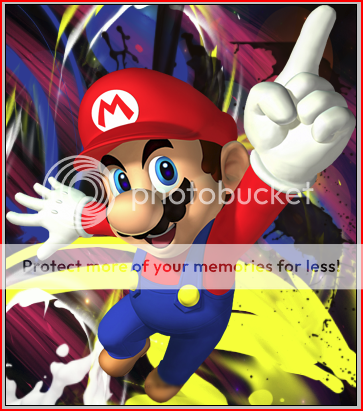
Now make your awesome looking sig using the full area or just half.
(be aware, you will be deleting the top half of the backround. Not the pop out part though)
Make sure you keep a seperate layer for the pop out part; or else everything in the pop out layer will be popping out and that could make your Sig look weird. (maybe cool)
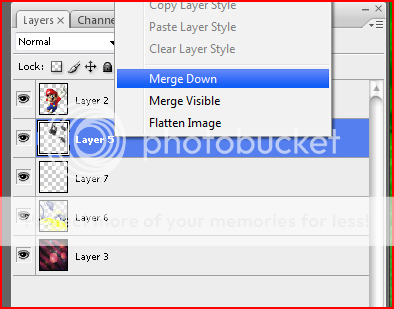
Once you have your Sig, make sure all the backround layers are under the main pop out layer. Right click on the 2nd layer (the one after the main pop out) and click merge down. This will put that layer and the one under it together. Keep doing this until all the layers are as one. So now you should have 2 layers.
After
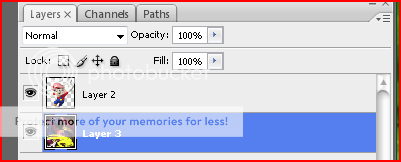
*Backround (all layers combined)
*Pop-out.
Note: if you added detail to your main pop out layer and you half 3 or more layers; just merge them onto the main pop out layer. NOT the backround layer
Now you have your 2 layers. Click on the second layer (not popup) and then click on the rectangle marque tool. then drag the rectangular box around the area you want to delete. Once you have it where you want, hit the delete button. The backround should be deleted, not the pop up. If the pop up part is also deleted, it means you clicked the first layer (pop up layer) then the marque tool. Go back and this time make sure you clicked the 2nd layer (backround)
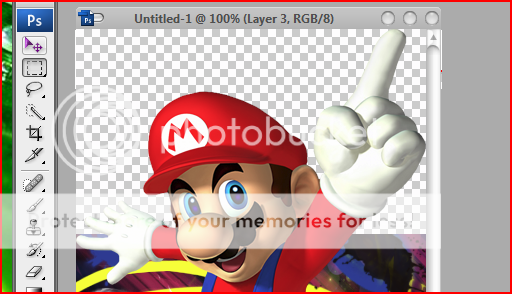
Note: The more you delete with rectangle marque tool, the more pop up will pop out.
Now here you should have the sig to the pop out stage and you should save.
Click the "save as" button and save it as a PNG! If must be a png or the backround you erased will be white, not see through.

now save your work (incase you want edit) and close it.
+rep if helped!
*confused pop up with pop out a lot of times.
*if you wanted rounded corners look at my rounded corners guide (yet to be made...maybe tommorow)
* if i have time i will insert pictures to help People who got way lost and didn't get this. I tried to make this as noob prrof as possible by not using complicated words.
-Pure
It's not as complicated as it looks
just hard to explain
*This might be a little complicated and a little hard to understand, so read carefully
lets say your signature is gonna be 350 x 200. But with the pop up it makes the hight higher.
* Example: My sig. , the hight is around 200 pxl. but with the fat head popping out it adds hight to the sig. that cant really be seen.
Make sure you estimate around how tall the part of your signature that is gonna pop out is. Because that is gonna be actual high of your Sig.
So now make a new project with the width and corresponding hight.
Now make your awesome looking sig using the full area or just half.
(be aware, you will be deleting the top half of the backround. Not the pop out part though)
Make sure you keep a seperate layer for the pop out part; or else everything in the pop out layer will be popping out and that could make your Sig look weird. (maybe cool)
Once you have your Sig, make sure all the backround layers are under the main pop out layer. Right click on the 2nd layer (the one after the main pop out) and click merge down. This will put that layer and the one under it together. Keep doing this until all the layers are as one. So now you should have 2 layers.
After
*Backround (all layers combined)
*Pop-out.
Note: if you added detail to your main pop out layer and you half 3 or more layers; just merge them onto the main pop out layer. NOT the backround layer
Now you have your 2 layers. Click on the second layer (not popup) and then click on the rectangle marque tool. then drag the rectangular box around the area you want to delete. Once you have it where you want, hit the delete button. The backround should be deleted, not the pop up. If the pop up part is also deleted, it means you clicked the first layer (pop up layer) then the marque tool. Go back and this time make sure you clicked the 2nd layer (backround)
Note: The more you delete with rectangle marque tool, the more pop up will pop out.
Now here you should have the sig to the pop out stage and you should save.
Click the "save as" button and save it as a PNG! If must be a png or the backround you erased will be white, not see through.
now save your work (incase you want edit) and close it.
+rep if helped!
*confused pop up with pop out a lot of times.
*if you wanted rounded corners look at my rounded corners guide (yet to be made...maybe tommorow)
* if i have time i will insert pictures to help People who got way lost and didn't get this. I tried to make this as noob prrof as possible by not using complicated words.
-Pure
It's not as complicated as it looks
just hard to explain
")